Today we started creating a website in the cloud for NET702 at NMIT. The cloud service provider is Amazon with their AWS Web Services. This project involves creating a distributed, highly available web system that is hosted in the cloud. This includes using Storage and a database to allow a user to load a consumer website.
This project and blog uses services, documents and files created by;
Instructions from; Mark Caukill – IT Teacher at NMIT
Project Files and Documents sourced from; www.pluralsight.com
Cloud System; aws.amazon.com
Week started 22/05/2015
NOTE
YouTube playlist of ScreenCasts included at end of this blog cover up to end week of 29/05/2015 of project work or Lab 1.
The first step is to install MySQL Workbench. This is downloaded and installed from the MySQL website. The install worked for me and I could create connections to local hosts without it requiring a password. Other people in the class had this problem so as I progress in the project I will see if my install worked. If it doesn’t I will have to use an alternate version that people with the problem used.
To host the website in AWS Web Services there product the S3 bucket is used to store the files. When logged in you navigate to the S3 management console and click create bucket then Name and make sure to select Region you want to host the bucket in. Then click create. When naming your bucket there are a series of restrictions to the naming conventions. This page details them. There are no limitations to the size of your bucket so keep in mind that the max storage limit for the free tier is 5GB. After that you will be charged so limit uploaded data to only important files and delete non essential files.
When the bucket is created it can be opened and folders created or uploaded along with files. When creating a folder in your bucket name it correctly because its name cannot be modified, it has to be deleted and made again. Uploading files is easy as clicking the upload button and dragging and dropping the files you want to upload. If you want your folders or files open the public, right click the folder or file and click open to public. A popup asking if you want to make it public will pop up, click OK. Now the folder or file is public.
This is required for the Static Website hosting so users can access files such as the index.html. If a bucket is to act as a Static Website Host this can be done under properties. Select Static Website Hosting and then click Enable Website Hosting. For the Index Document line enter the Index file name you want users to get pointed to. If you want to add a error log file you can.
Week of 25/05/2015 till 29/05/2015
This weeks focus was on getting the code and SQL running locally but with the images pulled from the S3 bucket setup previously. This involved downloading the pre-created website and then modifying the links to the images to match the ones we made public last time. Make sure that the project is located in C drive directory or one sub-directory in because of character lengths later on it may cause issues. To modify Shape Store I loaded the Shape Store Project into Visual Studio by opening the Pluralsight.ShapeStore_Mod1 file. This loads the solution like this;  Now in Site1.Master change the links to match that of your public links in your S3 bucket. I’ve highlighted the links I changed.
  Now go to build and build the solution. Next is to open MySql and connect to the local database. After running the provided script under schemas it should look like below.
 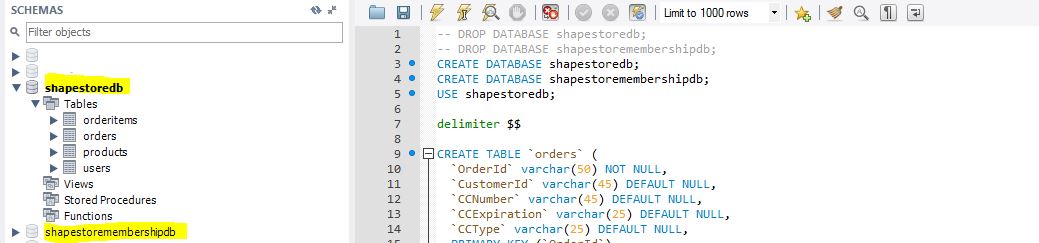 In a new query enter “SELECT * FROM shapestoredb.products;” this loads the table to insert the links to the products in. First the length of the URL allowed in the settings is only varchar(100). This is too short for the URL lengths that Amazon use so this needs to be changed. To do this click the little spanner shown below and then adjust the image reference to varchar(200) or longer also shown below.
 Next import your URL’s into the table from the provided Excel spreadsheet after changing the URL’s to suit yours. This is done by clicking the import/export button when the table is loaded. Below is what it looks like with the links imported;
  Now go back to Visual Studio and run the Solution to Chrome. This should locally load your Website but with your images coming from the S3 bucket as well as the j-query and css. Below is my running website also shown in the Inspector is the images coming from my S3 bucket.
 End for 29/05/2015
Week of 01/06/2015 till 05/06/2015
This week was used to create AWS MySQL RDS instances and start a DynamoDB Session Table. Setting up the RDS instance was so we could move the MySQL database from the local machine and onto the cloud. This involved creating an RDS instance and then making a read replica of it, testing the connection to them and then redirecting the website code to match the AWS RDS instances. Also made was the DynamoDB Session Tables for next weeks work. Launch a new MySQL RDS instance. Below are the settings used for our project which are based around trying to stay within the free tier or cost as little as possible to keep active. Follow the steps through filling in the required information where needed. Before creating the instance check you are in the correct region as this will affect later work.
- Micro instance
- Multi-AZ deployment
- Storage type = general purpose (ssd)
- 5GB storage
- DB Instance Identifier = ShapeStoreInstance
- Master username = *enter a username*
- Master password = *enter password*
- Security group = create new security group (NB: A security group allowing your current IP address to connect to your instance will be created. This will make it easier for you to connect to the instance and configure it.)
- Database name = shapestoredb
- Enabled automatic backups by selecting a period of days (NB: 0 = disabled)
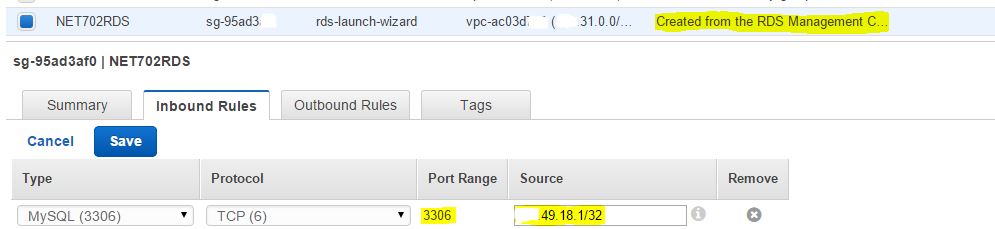
When the RDS instance is started go to the security group settings for the new instance and add your IP address to the inbound list so you can access it. Make sure the port number is 3306.
Once the RDS instance has fully started and you have added your IP go to the RDS instance and copy the endpoint. Make sure you copy the one without the port number added to the end as this will affect you trying to access it on MySQL. Below is where the correct link to copy is.

Now to remote login to your instance. For this go to MySQL and click the little plus next to MySQL connections to add a new connection. Paste in your endpoint into hostname and make sure it is connecting through port 3306. Add the credentials that you set up the instance with and name the connection relevant to your instance name, like below. 
Next test the connection and then connect to the instance. Once again you will need to rebuild the tables, schemas and populate them like you did for the local database. Also created now will be a membership schema for the logon section of the website. 
Now go back to the AWS console RDS page and right click on your RDS instance and select create a Read Replica. When prompted follow the below points.
- Replica Instance identifier = shapestoreinstancereplica
- Keep the instance class the same as the original instance
- Pick a different availability zone from the original instance
Now wait for this instance to finish starting and repeat the points above to remote access the instance using MySQL workbench. Does is have the same schemas and tables as you just made in the original? This instance is effectively a failover in case the original fails. Although this replica is Read only so no data can be written to it.
Now go to the Pluralsight.ShapeStore solution and in the Web.config go to near the bottom and under the connection strings
- Replace “127.0.0.1” with your original RDS instance endpoint from AWS for both the ‘DefaultConnection’ and ‘StoreSqlDb’.
- Below the two connection lines add another line copied from above with name=”StoreSqlDbReplica” and the endpoint link to the cloud replica database.
- At the end of the lines of code change the Uid’s to your Master Username and the Pwd’s to the Master Password you set so the website can access the Database.
![]()
Now in Default.aspx.cs change the ‘StoreSqlDb’ to ‘StoreSqlDbReplica’ like below;

Now rebuild the Site and open it in Chrome. Now you can Create an Account and Login. Connect on MySQL to your RDS instance and in the Membership Users Table there should be the Account you just made online.
Now to launch the DynamoDB Session Tables.
In DynamoDB console on AWS go to pre-create a session table following the steps below when prompted.
- Create table = ‘ASP.NET_SessionState’
- Primary key type = Hash
- Hash Attribute Name = SessionId
- Read Capacity = 3
- Write capacity = 1
- Turn off alarms
While it is creating go back to Visual Studio and install the extensions required.
In your application go into;
- Pluralsight.ShapeStore References – Manage NuGet Packages
- Choose ‘online’ on the left hand side.
- You should see ‘AWS SDK for .NET’ installed (if not, then install it)
- Search installed packages for ‘AWS SDK’. Install:
- AWS SDK for .NET:Extensions
- and AWS SDK for .NET: SessionProvider Extension
NOTE
When Logging into the shape store website I was having a server error come up saying that it couldn’t load mysql.web 6.7.4.0 in log code. It also suggested the version was wrong. Below is how I fixed it
In Web.config look for these to lines of code;![]() and
and
![]() Now looking your Manage NuGet Package Manager at your MySQL web package under installed packages and it will show the version number, like below;
Now looking your Manage NuGet Package Manager at your MySQL web package under installed packages and it will show the version number, like below;
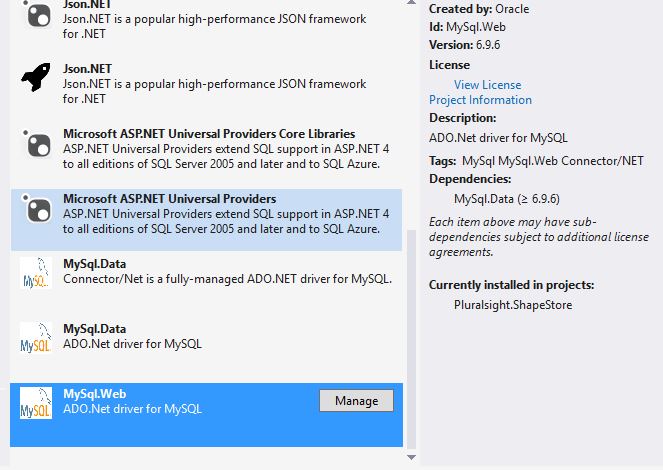 As you can see my version is 6.9.6 and not 6.7.4.0 that is shown in my code. If they don’t match change the code to match the new version, like below;
![]()
End of Week 05/06/2015
Week of 07/06/2015 till 12/06/2015
This week was finishing the DynamoDB work and configuring the site to use Simple Queue Services.
Carrying on from last week go to Web.config in your solution and Remove the ”

Now in your ShoppingCart.cs in the Pluralsight.ShapeStore.Objects solution add the code ‘[Serializable]’ like below;
 Now in your Session Tables in your AWS console there should be no items. Relaunch your website and add an item to the cart. Go back to the Session Tables and refresh. There should now be an item in the table.
Now to setup Simple Queue Service
Go to the the SQS management console. Again check you you are in the correct region.
- Click ‘Create a New Queue’
- Queue name = shapeorders
- Leave Default Settings
- Create
![]()
Test the queue by sending a message in ‘Queue Actions’
- Refresh the Queues screen and see if there are new messages available.
- View the message by right clicking on the queue and view/delete message.
- Start polling messages.

- Delete the message and stop polling.
In the Pluralsight.ShapeStore – Checkout.aspx.cs you need to:
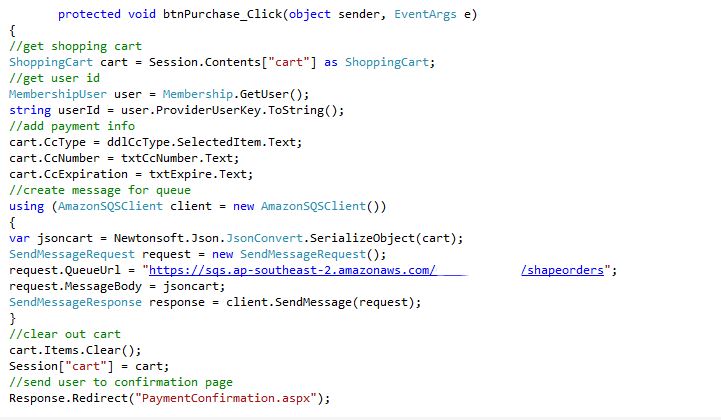
- Remove the code from ‘protected void btnPurchase_Click(object sender, EventArgs e)’ down to and including ‘Response.Redirect(“PaymentConfirmation.aspx”);’. (line 66 to 126 inclusive).
- Replace the above code with:
protected void btnPurchase_Click(object sender, EventArgs e) {
//get shopping cart ShoppingCart cart = Session.Contents[“cart”] as ShoppingCart;
//get user id MembershipUser user = Membership.GetUser(); string userId = user.ProviderUserKey.ToString();
//add payment info cart.CcType = ddlCcType.SelectedItem.Text; cart.CcNumber = txtCcNumber.Text; cart.CcExpiration = txtExpire.Text;
//create message for queue using (AmazonSQSClient client = new AmazonSQSClient()) { var jsoncart = Newtonsoft.Json.JsonConvert.SerializeObject(cart); SendMessageRequest request = new SendMessageRequest(); request.QueueUrl = “YOUR QUEUE URL HERE”; request.MessageBody = jsoncart; SendMessageResponse response = client.SendMessage(request); }
//clear out cart cart.Items.Clear(); Session[“cart”] = cart;
//send user to confirmation page Response.Redirect(“PaymentConfirmation.aspx”);
At the top of Checkout.aspx.cs add the follow three lines like below;
 Now back in the Manage NuGet Packages. Search for and install the Json.NET package. This allows the serialised data to be added to the Queue as a JSON object.
Back in the Pluralsight.ShapeStore Web.config file you now need to add credentials of the chosen IAM . Insert the following code after ‘ValidationSettings:UnobtrusiveValidationMode’;
![]()
Now rebuild your solution again and launch in Chrome. Login and add an item to the cart. Checkout using fake credit card details to protect yourself. Go to your SQS management console and pole the messages. There should be a message there for the item you just brought. You can delete the message if you want.
We now need to add a new application to the project that can pull the orders from the queue. Add the folder from the ‘Pluralsight.ShapeStore.OrderProcessor.zip’ file to the code. This console project code polls the message queue for up to ten messages at once, and deserializes the JSON objects back into a shopping cart objects, deletes the processed messages, and adds the orders to your MySQL cloud database that you created earlier.
– Insert your shapeorders queue URL into the Pluralsight.ShapeStore.OrderProcessor ‘Program.cs’ code:
- request.QueueUrl
- batchRequest.QueueUrl
– Into the orderprocessor ‘App.config file:
- Insert your AWSRegion at the ‘add key’point.
- Insert your access keys at the ‘add key’ points.
- Change your StoreSqlDb server connection string to your shapestoreinstance URL, and add your DB username and password to this line.
– Right click on Pluralsight.ShapeStore.OrderProcessor project and select ‘Set as Startup Project’
– Right click the new project, choose Properties-Signing and untick the ‘Sign the ClickOnce manifests’
Now rebuild your Website and relaunch it and add and item to the cart and checkout again. Run the Pluralsight.ShapeStore.OrderProcessor application. This will pull the order message from the queue, add it to the database, and delete the message, this should show in the console. This app will sit and poll the message queue until closed.
NOTE
When starting the Pluralsight.ShapeStore.OrderProcessor program I had this error show;

This was in the program.cs solution after it was started.
To fix got to your App.config solution and add the region code like below;

End of Week 12/06/2015
Week of 15/06/2015 till 19/06/2015
This week was a big week because it involved moving the code to the Cloud using Amazon EC2 instances. Then configuring them so that they would auto scale and load balance when put under load.
To do this in the IAM console dashboard, choose Policies (left hand side)
– Create a policy by using the Policy Generator
- Allow
- Amazon DynamoDB
- Actions: deleteitem, describetable, getitem, putitem, updateitem
- Amazon Resource Name (ARN): YOUR DynamoDB ARN
Add another
- Allow
- Amazon SQS
- Actions: deletemessage, deletmessagebatch, getqueueurl, receivemessage, sendmessage, sendmessagebatch
- Amazon Resource Name (ARN): YOUR SQS ARN
Should look something like this;

– Policy name = DynamoSqsPolicy
Still in IAM:
– Create a new role = WebServerRole
– AWS Service Roles = Amazon EC2
– Attach policies (customer managed policies):
- DynamoSqsPolicy

Now in the EC2 dashboard, launch a new instance for the web server.
– Pick the free tier Microsoft Windows Server 2012 R2 Base
– General purpose t2.micro
– IAM role = WebServerRole
– Tag it with a name.
– Create a new security group
- WebRDPGroup
- Web or RDP access – created for net701 lab web server ec2 instance.
- RDP: source must be your location IP address.
- HTTP: all sources
- WHEN YOU LAUNCH, REMEMBER TO SAVE YOUR PRIVATE KEY FILE IF YOU CREATE A NEW KEY PAIR!!!

Back in the EC2 dashboard, launch another instance for the queueing server.
– Same as above but follow the below Security Group settings
- RDPGroup
- RDP access – created for net701 lab queue server ec2 instance.
- RDP: source must be your location IP address.
- Use the key from above – but make sure you have saved it!

Wait for the instances to start and complete status checks. When they are ready;
– On the web server instance, right click to get the windows password.
– Browse to where the key file is stored and decrypt the password.
– Record the details.
– Right click to connect to the server.
- Download the remote desktop file
- Connect

– Install IIS and include asp.NET 4.5 (including developer stuff), HTTP connectors and windows authentication role services Like below;


While the above installs open your project in Visual Studio and:
– Right click on the ShapeStore project and publish as a file system to any folder where you can retrieve these files from. E.g. D:\Pluralsight.ShapeStore\
When the IIS webserver roles have installed on the web server;
– Copy the shape store application you published to the AWS EC2 instance.
– Copy to \inetpub\wwwroot d. In IIS right click on your newly copied folder in wwwroot, and ‘Convert to Application’.
– Alias = Pluralsight.ShapeStore
Now go to the AWS VPC dashboard – Security Groups we are going to allow instances in the RDP and WebRDP security groups to access instances in the RDS security group. This allows for easy scaling.
– Locate the security group that was created when you created your RDS- In the Inbound Rules tab click edit, add two new rules, and save:
- New rule one: 1. Type = All Traffic, Protocol = ALL, Source = ‘YOUR RDPGROUP SECURITY GROUP’
- New rule two: 1. Type = All Traffic, Protocol = ALL, Source = ‘YOUR WEBRDPGROUP SECURITY GROUP’
– It should look like this but with your names;

On your cloud web server, in the folder you just published:
– Use Notepad to edit the ‘Web.config’ file.
– Remove the DynamoDBSessionStoreProvider keys (just delete the keys from between the quotes: AWSAccessKey=”” AWSSecretKey=””).
– Remove the keys (just delete the keys from between the quotes: AWSAccessKey=”” AWSSecretKey=””).
– Save the file.
Now open the IIS Manager:
– Highlight your website in the connections pane.
– Go into ‘Content View’ (bottom-middle of window).
– Right click on ‘Default.aspx‘, and browse.
– This will open your website locally
– Give it a quick test out checking the various aspects
Now test it over the public internet connection.
– Copy the EC2 endpoint link to your browser then add ‘/YOUR WEBSITE NAME/’ E.g. /Pluralsight.ShapeStore/ to the URL and you should now see your ShapeStore website.

Next to put the order processing app up on the queue server; in Visual Studio:
– Click on the Pluralsight.ShapeStore.OrderProcessor and choose ‘Release’ from the Solutions Configuration pulldown at the top of the window.
 – Right click on the Pluralsight.ShapeStore.OrderProcessor and ‘Publish’.
– Save it to a easily accessible place
RDP into your Queue server like you did for the Web Server and copy the Pluralsight.ShapeStore.OrderProcessor folder created locally above, onto your cloud desktop.
We want the server to run the order processor application at startup. Normally this would be set up as a windows service, but in this case we are just running it as an application.
– Open up the order processor folder.
– Make a shortcut of the ‘setup.exe’ file and copy it to: C:\ProgramData\Microsoft\Windows\Start Menu\Programs\StartUp
!*NOTE*!
You may have to show hidden files to see this location
– Then run the application.
Now to check that this is all running;
In MySQL, connect to the AWS ShapeStore database and note what is in the orders table. There may be at least one order from earlier.
In your local browser, open up your cloud website like you did above;
– Log in.
– (Before you do this step, make sure you have your RDP session to the web server) Add a items to your cart, and check out.
- This should add the order to the queue.
- Now look at the Console on the Queue Server quickly
- You should have seen the ‘Queue messages received: count is 1’ and then the ‘Queue message(s) deleted’ lines come up on the console like below;

Now we need to create images to launch the above two instances quickly with the same setups.
To do this create images of the Web server and the Queue Server;
 Enter the details accordingly like below;

Create the image.
Now test the image by going to the snapshot image of the Web Server and launch it like below;

Following these settings;
- Type = t2.micro
- In subnet you could choose which AZ to put the new web server instance in if you wanted to spread them around your region. For this purpose you could choose ‘No preference’
- IAM role = WebServerRole d. Add a tag (e.g. Name = WebServer02)
- Select an existing security group = WebRDPGroup
- After launching, choose the same key pair you created for the original web server and queue server.
When it has started and is running Launch your site like you did before by copying the Endpoint and adding the /”your site name”. This should open your site but with a different IP address.
Now we can use the above images to create Auto Load Balancing and Auto Scaling to handle increases in traffic.
First we will start with Auto Load Balancing;
In your AWS EC2 dashboard, choose ‘Load Balancers’ (left hand side).
– Click ‘Create Load Balancer’
– Load Balancer name = ShapeStoreLB
– Keep the default load balancer configuration at HTTP and port 80.
– Select your existing ‘WebRDPGroup’ security group.
– Ping Protocol = TCP
– Ping port = 80
– Add the Original and Image Web Server instances you created earlier.
Now let that start and register and it should show up like this;

When you open the description that you should note;

Copy the endpoint link and add /”your site name” like below;

This should open your site but now when you refresh the page quickly you should see the page load with a different IP address. For example;
 and/”your site name”. This should open your site but with a different IP address.
 Now that Load Balancing is running we can add Auto Scaling to the website.
In your AWS EC2 dashboard, under Auto Scaling choose ‘Launch Configurations’ (left hand side)
– Click ‘Create Auto Scaling Group’
– Click ‘Create launch configuration’
- Select your ShapeStoreWebServer from the ‘My AMs’ section
- t2.micro
- Name = scale-web
- IAM role = ‘WebServerRole’
- Select an existing security group = WebRDPGroup
- Click ‘Review’ and ‘Create launch configuration’
- Choose the existing key pair from the key created with your original web server.
- Click ‘Create launch configuration.’
– Now in ‘Create Auto Scaling Group’
- Group name = scale-web-asg
- Group size = start with two (2) instances
- Network = default VPC
- Subnet = choose both of your default subnets by clicking in the field box, one in each AZ. NB: this allows instances to start in both.
– In Advanced details:
- Tick ‘Receive traffic from Elastic Load Balancer(s)’
- Choose the ELB you just created = ShapeStoreLB
- Health Check Type = ELB
– Click ‘Next: Configure scaling policies’
- Keep the group at its initial size. Note that you can use scaling policies if you had criteria to scale up or down beyond the two instances we have.
- Configure tags. Name = ASG-WebServer, tick ‘Tag instances’
– Create the Auto Scaling Group

Now go to the instances management console and watch the new instances open like below;

Stop the original web server instances because these are not needed now as new ones will be launched automatically by the auto scaling.
Now load the webpage using the Load Balancing link and then refreshing the page quickly you should see extra instances starting to handle the load and when they are no longer needed they should terminate like below;
 End of Week 19/06/2015
Project completed.
Link to Blog Post = https://digitalinsaniti.wordpress.com/2015/06/24/530/
YouTube Video Playlist covering Lab1 = https://www.youtube.com/playlist?list=PLmX-7gShBj4f5GA2vhSGBet8crgAfg7JN
